 COMMUNICATION is difficult when nobody else speaks 'sock monkey'

Sunday, February 25, 2007
Saturday, February 24, 2007


Friday, February 16, 2007
L-DX 2000 diapers
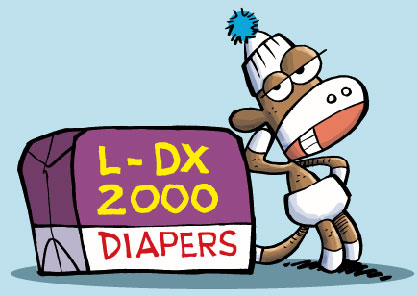 Introducing the new SocMo approved Long Distance Diaper! Yes, now when you take that long drive to a far away city... like say, Orlando... you can drive non-stop if you strap on one of these diapers. The L-DX 2000 was designed by NASA engineers using the latest absorbancy technology. Special layers wick away moisture so you can drive in comfort as you guzzle Mountain Dew and eat that giant bag of Cheese puffs. What could be better? They are also recommended wear while flying. Who knows when you will sit on a runway for 9 hours waiting for take off? Or get stranded on the interstate in some massive winter traffic jam.
 You can smile as others around you are going crazy. Remember, the L-DX 2000 is the only SocMo approved diaper. Wear it with confidence. Buy now and get a free jar of Salmonella Peanut Butter.
Saturday, February 10, 2007
CRASH!
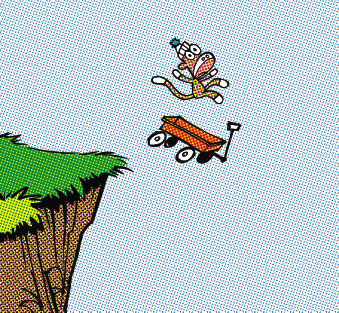 Can't you just anticipate the CRASH?
 This is a tribute to one of the best comic strips ever... Calvin and Hobbes. I used to love it when Calvin went flying into the abyss on his little red wagon or sled. The strip was the perfect combination of art and writing. It ended much too soon. I still miss it. I have been a life long fan of the comic strip. I always thought it was my destiny to draw a syndicated comic strip, but it never happened. I drew a strip in a magazine for many years but that ended a while back.
Every day I start my morning with a mug of coffee and read comics online. Here is a little secret I will share with any of you comics lovers. Go to the Houston Chronicle comics page and click on the "build your own comics page." You will be able to put up to 8 comics of your choice on a page and bookmark it. Then each day you just go to the bookmark and see those comics. I have two pages that I read each day.
HEY! I counted up... and THIS is my 100th post on JONESAPALOOZA since I started it in October 2005! WOO HOO! There is just something about those big, round numbers like 100! Thanks to everyone who stops by from time to time, and thanks to all who take the time to drop me a comment. I appreciate it!
I hope the next 100 is just as fun!
6 weird things about me...
 Well, I got tagged by Bron Smith, creator of the marvelous Trowbridge Chronicles, and MrsB, the creator of wonderful, whimsical illustrations. It must have been a tag team double whammy on me. I am on the ropes! I have to list 6 weird things about myself, then tag 6 others to do the same.
 So... here is my list:
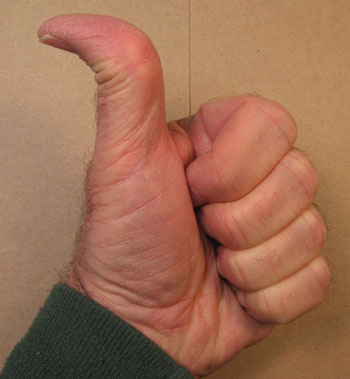
1. As you can see by the photo... I can bend my thumbs back 90 degrees. I always thought that would help me out when hitchhiking, but never have tried it.
2. My sense of smell is wonky. I am never aware of smelling anything. This used to come in handy when I had to change diapers.
3. I painted a 10 foot tall fiberglass GUITAR which stood in front of the Country Music Hall of Fame and Museum in Nashville one summer.
4. I am learning to play a ukulele that I bought on eBay recently. Think ukuleles are not cool? Just take a look at THIS!
5. I still have a sock monkey that my mom made for me when I was a wee little kid.
6. I don't always follow the rules. Like now. I am supposed to tag 6 other people to make a list... but I'm not gonna do it. Am I a rebel or what?

Sunday, February 04, 2007
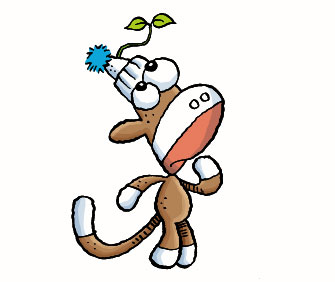
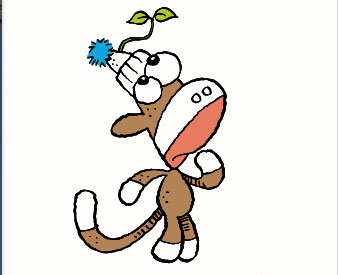
SPROUT

You know it is time to wash your hat when you find a SPROUT growing in it!
Hey, I have made a 5 part tutorial using this image, showing how I use Photoshop for coloring. If anyone is interested in seeing how to add color with Photoshop, please take a look. You can find the tutorial here.
TUTORIAL
I hope this will be helpful to anyone curious about how to color digitally.
Photoshop color part 5... colored lines
Let's change some of the black lines that outline everything. First we need to Merge the layers. Go to Layer>Merge Visible... and Presto! you now have one layer!
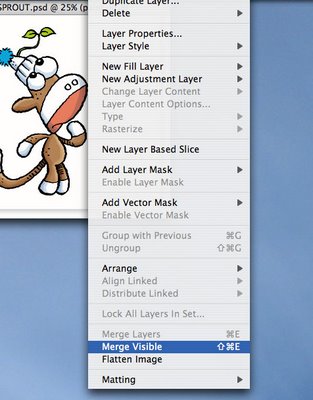
Here is the Merged layer.

Now use the Wand and click on the black line. It selects ALL the black lines if the Contiguous box is unchecked. Don't like those ants? You know how to get rid of them now.

I have now used the pencil tool again. Make sure the tool is set back to Mode: Normal and 100% Opacity. I sampled the green color and darkened it a bit with some black. Then you just pencil over the black lines and color them. I did the same to the fuzzy ball on top of the hat. This is handy for coloring words or something like clouds that have a black outline around them. If you used the sky color and painted out the outlines, you would be left with just white clouds against the blue sky. Cool, eh?
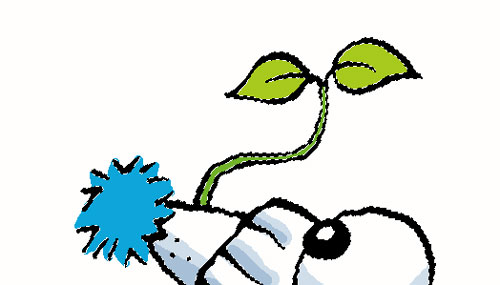
OK... I'm running out of time, so this is the finished image. Here is a recap of what I did to the background. I filled the background with a yellow color. I selected all the yellow with the Wand and then used the soft brush with white and clicked on a spot right behind the sprout. Deselect. Don't forget to deselect things. Sometimes nothing seems to work and I realize that I have something selected. I had forgotted because I like to Hide those marching ants, doncha know. OK, I now selected the rectangle at the bottom with the rectangle selection tool and filled it with a green color. I selected another oval shape and darkened it for a shadow. Then just for kicks, I used the Burn tool around the edges. Now if you are using this on the WEB, go to Image>Image Size and change the resolution to 72dpi and I always use the File>Save for the Web to save a jpeg.

Whew! That's it! I hope this will help someone make the transition to digital color. It may look scary, but it is really not. Once you get the hang of it, it is so easy to do. If this has helped you, or if you think it may help someone else, feel free to link to it. JONESAPALOOZA doesn't get that many visitors, so you are welcome to link to this and help spread the info.
Happy coloring!

Here is the Merged layer.
Now use the Wand and click on the black line. It selects ALL the black lines if the Contiguous box is unchecked. Don't like those ants? You know how to get rid of them now.
I have now used the pencil tool again. Make sure the tool is set back to Mode: Normal and 100% Opacity. I sampled the green color and darkened it a bit with some black. Then you just pencil over the black lines and color them. I did the same to the fuzzy ball on top of the hat. This is handy for coloring words or something like clouds that have a black outline around them. If you used the sky color and painted out the outlines, you would be left with just white clouds against the blue sky. Cool, eh?

OK... I'm running out of time, so this is the finished image. Here is a recap of what I did to the background. I filled the background with a yellow color. I selected all the yellow with the Wand and then used the soft brush with white and clicked on a spot right behind the sprout. Deselect. Don't forget to deselect things. Sometimes nothing seems to work and I realize that I have something selected. I had forgotted because I like to Hide those marching ants, doncha know. OK, I now selected the rectangle at the bottom with the rectangle selection tool and filled it with a green color. I selected another oval shape and darkened it for a shadow. Then just for kicks, I used the Burn tool around the edges. Now if you are using this on the WEB, go to Image>Image Size and change the resolution to 72dpi and I always use the File>Save for the Web to save a jpeg.

Whew! That's it! I hope this will help someone make the transition to digital color. It may look scary, but it is really not. Once you get the hang of it, it is so easy to do. If this has helped you, or if you think it may help someone else, feel free to link to it. JONESAPALOOZA doesn't get that many visitors, so you are welcome to link to this and help spread the info.
Happy coloring!
Photoshop color part 4... form
Now that we have flat color in all the shapes, lets round the form some. To do this I use the pencil tool. If you want a smooth, air-brushy look to your work, you can use the soft brush. The brush is just a bit slick for me, so I like to use the pencil. First you have to tell Photoshop what you want to work on. You do this with the Wand. If you don't click on the Contiguous box, the Wand will select everything that is the color you have clicked on. I clicked on the brown color and now all the brown has been selected.

When an area is selected you see the "marching ants" crawling around the edge of the selection. To get rid of the ants, hit the Command+H keys. Think "H" for Hide. Now them ants are gone. GONE! They can be distracting sometimes.
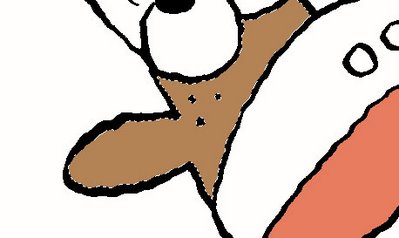
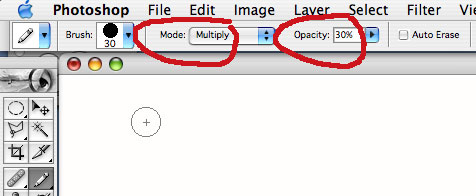
Grab the pencil tool and put the Mode on Multiply and the Opacity to around 30%.

Hold the pencil tool over the brown color and hold down the Option key (you should get the eye dropper) and click on the brown color. This samples the color and now it is ready to use. I have made two passes along the edge of the ear. The first pass darkens the color 30%. The second pass darkens it another 30%. I am using the mouse here. If you have a Wacom tablet you can go to town, building up a painterly looking form.
Now we will lighten some areas. Go back to the pencil and change the Mode to Screen and leave the Opacity at 30%.

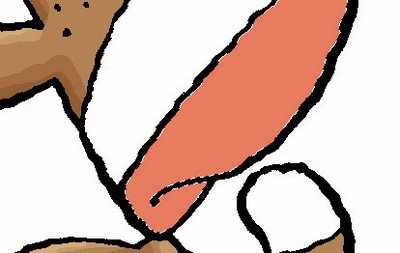
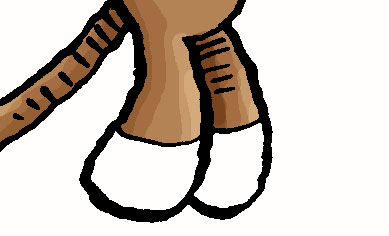
You can see where I used the Screen mode on the legs. Again, one pass lightened the color and the second pass lightened it even more. 30% may not be quite enough. I find that it is better to use a small amount and work up to the amount of light and dark you want. This is something you can play around with and see what works for you.

Now you need to Deselect everything. That is done with Command+D (Deselect). Click on the Wand again and then click the Contiguous box. When you do this, the Wand only selects the shape you have clicked on. I want to select the white in the mouth. If I don't click the Contiguous box, the Wand woud select the background and everything else white.

OK, now I have the white in the mouth selected and I want to add the red part. To do this hold down the Shift key and click in the red area. Holding the Shift key ADDS another area to the selection. Remember... Command+H will hide those marching ants.
Using the pencil tool (on Multiply and 100%) I make a light blue color and apply it to the mouth. Multiply works like putting down a transparent wash. The blue colors the red but allows the red color to show through.

There we go! Flat color modified with the pencil. This adds a bit of form to the figure. I think the effect may be too subtle. You may want to tweak it up a bit.
But what about those black lines around everything? Let's get rid of some of them... take one giant leap to Part 5... the final episode.

When an area is selected you see the "marching ants" crawling around the edge of the selection. To get rid of the ants, hit the Command+H keys. Think "H" for Hide. Now them ants are gone. GONE! They can be distracting sometimes.

Grab the pencil tool and put the Mode on Multiply and the Opacity to around 30%.
Hold the pencil tool over the brown color and hold down the Option key (you should get the eye dropper) and click on the brown color. This samples the color and now it is ready to use. I have made two passes along the edge of the ear. The first pass darkens the color 30%. The second pass darkens it another 30%. I am using the mouse here. If you have a Wacom tablet you can go to town, building up a painterly looking form.

Now we will lighten some areas. Go back to the pencil and change the Mode to Screen and leave the Opacity at 30%.

You can see where I used the Screen mode on the legs. Again, one pass lightened the color and the second pass lightened it even more. 30% may not be quite enough. I find that it is better to use a small amount and work up to the amount of light and dark you want. This is something you can play around with and see what works for you.
Now you need to Deselect everything. That is done with Command+D (Deselect). Click on the Wand again and then click the Contiguous box. When you do this, the Wand only selects the shape you have clicked on. I want to select the white in the mouth. If I don't click the Contiguous box, the Wand woud select the background and everything else white.

OK, now I have the white in the mouth selected and I want to add the red part. To do this hold down the Shift key and click in the red area. Holding the Shift key ADDS another area to the selection. Remember... Command+H will hide those marching ants.
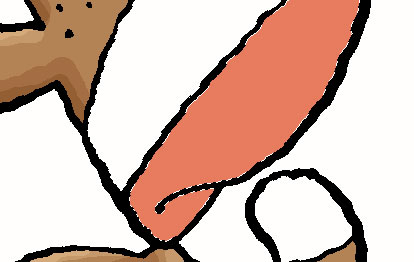
Using the pencil tool (on Multiply and 100%) I make a light blue color and apply it to the mouth. Multiply works like putting down a transparent wash. The blue colors the red but allows the red color to show through.

There we go! Flat color modified with the pencil. This adds a bit of form to the figure. I think the effect may be too subtle. You may want to tweak it up a bit.

But what about those black lines around everything? Let's get rid of some of them... take one giant leap to Part 5... the final episode.
Saturday, February 03, 2007
Photoshop color part 3... flat color
Now we have our image and the layers set up... we are ready to paint! I usually try to make sure all my shapes are enclosed. This makes for fast coloring with the old paint bucket. If you have gaps in your shapes you can still color... it just takes another step... we will get to that later. First I go to the color window and make a brown color. I use the sliders. I understand the CMYK sliders better than anything else so that is how I create colors. You may have another way to do it... that's fine. After I have the color I want, I use the paint bucket to click the color into the image. Click, click, click. Photoshop fills in the shapes... and always stays in the lines! Cool beans, dude!

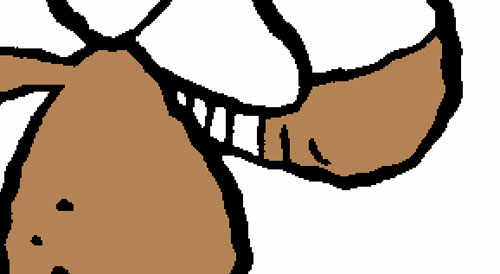
If you have some crosshatching or small shapes (like we see here) you can zoom in so you can get the paintbucket to fill the shapes. If you have LOTS of crosshatching, you can use the pencil tool and just color it in. This is the great thing about the layers you made. You may color over the black lines on the Paint layer, but on the Line layer they are still there! WOO HOO!

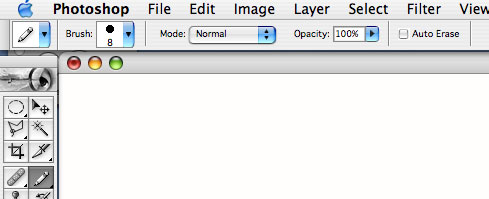
OK... let's say you have a shape and you didn't get it enclosed. Or... your inking style has lots of open spaces in it. Here is what to do. Get the pencil tool. Check to see that it's Mode is normal and the Opacity is 100%.

Now you have to dam up any openings in your shape, using the same color that you will fill it with. You can use the [ and ] (bracket) keys to make the pencil size larger or smaller. I am constantly zooming in and out and changing the brush size as I work. Here you see that I am "connecting the dots" to make sure my shape is enclosed. Then I can fill it with the paitbucket like the other shapes.

There we go! I have filled all the shapes with flat color in just a couple of minutes. Next we will look into adding some dimension to the flat color, using the pencil tool. Proceed directly to part 4. Do not pass GO... do not collect $200.

If you have some crosshatching or small shapes (like we see here) you can zoom in so you can get the paintbucket to fill the shapes. If you have LOTS of crosshatching, you can use the pencil tool and just color it in. This is the great thing about the layers you made. You may color over the black lines on the Paint layer, but on the Line layer they are still there! WOO HOO!
OK... let's say you have a shape and you didn't get it enclosed. Or... your inking style has lots of open spaces in it. Here is what to do. Get the pencil tool. Check to see that it's Mode is normal and the Opacity is 100%.
Now you have to dam up any openings in your shape, using the same color that you will fill it with. You can use the [ and ] (bracket) keys to make the pencil size larger or smaller. I am constantly zooming in and out and changing the brush size as I work. Here you see that I am "connecting the dots" to make sure my shape is enclosed. Then I can fill it with the paitbucket like the other shapes.

There we go! I have filled all the shapes with flat color in just a couple of minutes. Next we will look into adding some dimension to the flat color, using the pencil tool. Proceed directly to part 4. Do not pass GO... do not collect $200.

Photoshop color part 2... layers set up
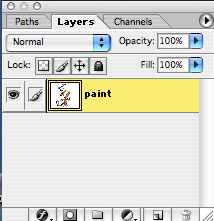
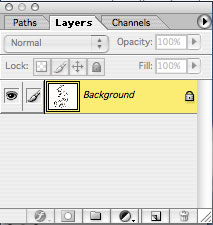
All righty, now... we need to go over to the layers window and get the layers set up. You will find the Background layer highlighted. Double click on the highlighted area and you will get a pop up screen. Name this layer "paint"

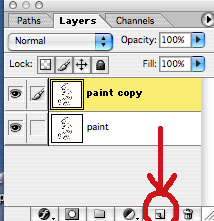
Next, drag the paint layer to the "create new layer" icon to duplicate it. The copy will appear above the original layer.

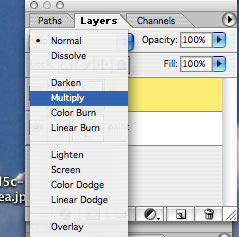
With the copy layer selected, find the mode (it will say Normal) and change it to Multiply. This will allow you to see through this layer as you paint on the layer under it. Double click on the words "Paint copy" and change the name to "Line"

Now you have two layers. The top layer is your Line art in Multiply mode. The bottom layer is where you will paint. Make sure the bottom layer is selected. Whatever you do to your image will always be done on the layer that is selected.
 That wasn't too bad was it? It sounds more complicated that it really is. Now we are all ready to paint! Get a big bucket of water and your paint brush and meet me for Part 3.
Next, drag the paint layer to the "create new layer" icon to duplicate it. The copy will appear above the original layer.
With the copy layer selected, find the mode (it will say Normal) and change it to Multiply. This will allow you to see through this layer as you paint on the layer under it. Double click on the words "Paint copy" and change the name to "Line"
Now you have two layers. The top layer is your Line art in Multiply mode. The bottom layer is where you will paint. Make sure the bottom layer is selected. Whatever you do to your image will always be done on the layer that is selected.
 That wasn't too bad was it? It sounds more complicated that it really is. Now we are all ready to paint! Get a big bucket of water and your paint brush and meet me for Part 3.
Photoshop color part 1... the scan
I thought I would try to explain how I use Photoshop to color my drawings. A few years ago I didn't have a clue how to do this. I found a magazine article that explained what to do, and I have been using that method ever since. If anyone wants to do digital color, but doesn't know where to begin... I hope to make this Photoshop Color for Dummies. YOU CAN DO IT!
First of all, I am using Photoshop 7 on a Mac. If you have another version of Photoshop, I am sure it will be similar to what I have. If you have a PC... I'm sorry... :o) there are equivalent keys on your keyboard to match what I will be using. Ok... let's get started, shall we?
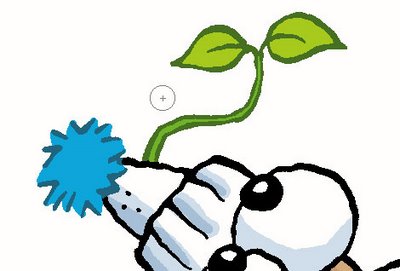
I drew the image with a blue pencil. I like drawing with different colors of Col-Erase pencils. I used to draw with a mechanical pencil all the time, but now I find it fun to use these just for a change.

I put a piece of vellum over the sketch and inked it in using a crow quill pen (Hunt 102). Actually, most of the time I use some kind of disposable pen like a Micron or Pitt pen on copier paper. Anything that makes a black line on paper will do... but you knew that, right?

I accidentally drug my finger through the wet ink... dang!... but not to worry! I will fix this later in the scan. Woo!... my fingers are not very photogenic, are they? I need a finger makeover, and I need it NOW!

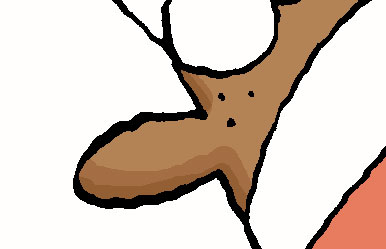
I have an Epson scanner and I use the Black and White setting, not color, for scanning my line art. Don't use the color settings. I scan at 600dpi. This gets me a good high quality scan. After it is scanned I use the eraser tool to clean up any boo-boos. I never have to buy white-out again! Here you can see the eraser starting to erase the smear on the leg. For some strange reason, I actually enjoy this step. I zoom in at 100% and go hunting for things to correct. Little black dots... lettering that needs some cleaning up... this is where it all gets done.

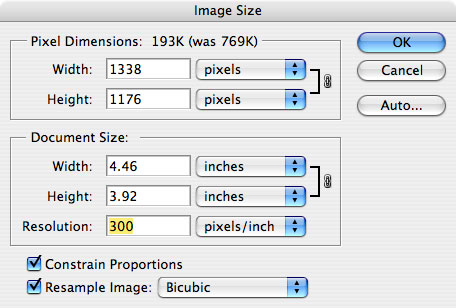
After I have had all the fun with the eraser that I can stand, I go to IMAGE>IMAGE SIZE to change the dpi

I change the 600dpi to 300dpi. This is the resoultion required for jobs that are to be printed. This is the resolution I work in. If the image is to be used on the web, I will reduce it to 72dpi after I have finished the coloring.

Next, we need to get this into a file we can add color to... so we go to IMAGE>MODE>GRAYSCALE. You will get a screen that says size ratio: 1.... click OK. We have just changed the file from bitmap to grayscale.
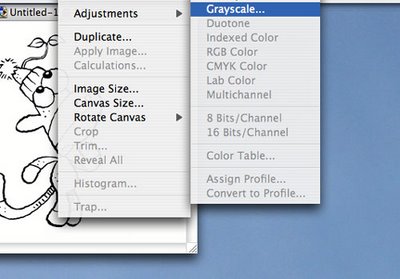
Next we go to IMAGE>MODE>RGB COLOR. Since the destination for this image is the WORLD WIDE WEB... we will use the RGB mode. If this was to be printed, I would use the CMYK setting here.
 Now we need to set up the layers so we can apply color. That will be in "PART 2 Return of the Layers"
First of all, I am using Photoshop 7 on a Mac. If you have another version of Photoshop, I am sure it will be similar to what I have. If you have a PC... I'm sorry... :o) there are equivalent keys on your keyboard to match what I will be using. Ok... let's get started, shall we?
I drew the image with a blue pencil. I like drawing with different colors of Col-Erase pencils. I used to draw with a mechanical pencil all the time, but now I find it fun to use these just for a change.

I put a piece of vellum over the sketch and inked it in using a crow quill pen (Hunt 102). Actually, most of the time I use some kind of disposable pen like a Micron or Pitt pen on copier paper. Anything that makes a black line on paper will do... but you knew that, right?

I accidentally drug my finger through the wet ink... dang!... but not to worry! I will fix this later in the scan. Woo!... my fingers are not very photogenic, are they? I need a finger makeover, and I need it NOW!

I have an Epson scanner and I use the Black and White setting, not color, for scanning my line art. Don't use the color settings. I scan at 600dpi. This gets me a good high quality scan. After it is scanned I use the eraser tool to clean up any boo-boos. I never have to buy white-out again! Here you can see the eraser starting to erase the smear on the leg. For some strange reason, I actually enjoy this step. I zoom in at 100% and go hunting for things to correct. Little black dots... lettering that needs some cleaning up... this is where it all gets done.

After I have had all the fun with the eraser that I can stand, I go to IMAGE>IMAGE SIZE to change the dpi
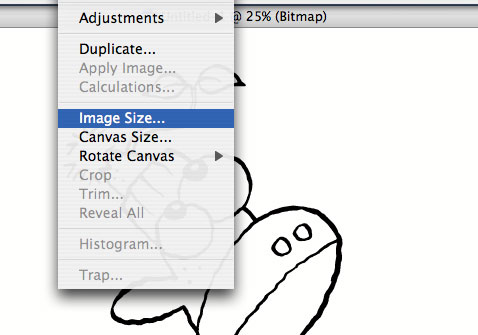
I change the 600dpi to 300dpi. This is the resoultion required for jobs that are to be printed. This is the resolution I work in. If the image is to be used on the web, I will reduce it to 72dpi after I have finished the coloring.
Next, we need to get this into a file we can add color to... so we go to IMAGE>MODE>GRAYSCALE. You will get a screen that says size ratio: 1.... click OK. We have just changed the file from bitmap to grayscale.
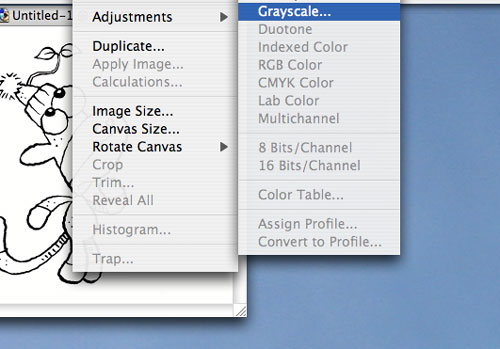
Next we go to IMAGE>MODE>RGB COLOR. Since the destination for this image is the WORLD WIDE WEB... we will use the RGB mode. If this was to be printed, I would use the CMYK setting here.
 Now we need to set up the layers so we can apply color. That will be in "PART 2 Return of the Layers"
Subscribe to:
Posts (Atom)