
First of all, I am using Photoshop 7 on a Mac. If you have another version of Photoshop, I am sure it will be similar to what I have. If you have a PC... I'm sorry... :o) there are equivalent keys on your keyboard to match what I will be using. Ok... let's get started, shall we?
I drew the image with a blue pencil. I like drawing with different colors of Col-Erase pencils. I used to draw with a mechanical pencil all the time, but now I find it fun to use these just for a change.

I put a piece of vellum over the sketch and inked it in using a crow quill pen (Hunt 102). Actually, most of the time I use some kind of disposable pen like a Micron or Pitt pen on copier paper. Anything that makes a black line on paper will do... but you knew that, right?

I accidentally drug my finger through the wet ink... dang!... but not to worry! I will fix this later in the scan. Woo!... my fingers are not very photogenic, are they? I need a finger makeover, and I need it NOW!

I have an Epson scanner and I use the Black and White setting, not color, for scanning my line art. Don't use the color settings. I scan at 600dpi. This gets me a good high quality scan. After it is scanned I use the eraser tool to clean up any boo-boos. I never have to buy white-out again! Here you can see the eraser starting to erase the smear on the leg. For some strange reason, I actually enjoy this step. I zoom in at 100% and go hunting for things to correct. Little black dots... lettering that needs some cleaning up... this is where it all gets done.

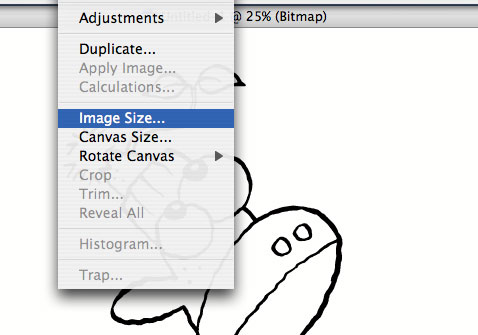
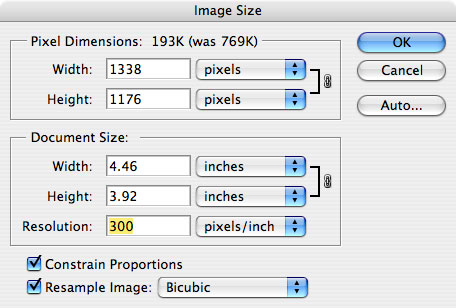
After I have had all the fun with the eraser that I can stand, I go to IMAGE>IMAGE SIZE to change the dpi
I change the 600dpi to 300dpi. This is the resoultion required for jobs that are to be printed. This is the resolution I work in. If the image is to be used on the web, I will reduce it to 72dpi after I have finished the coloring.
Next, we need to get this into a file we can add color to... so we go to IMAGE>MODE>GRAYSCALE. You will get a screen that says size ratio: 1.... click OK. We have just changed the file from bitmap to grayscale.
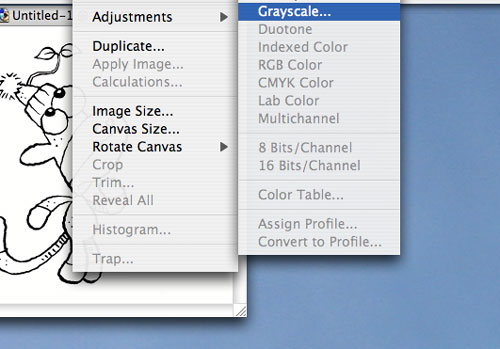
Next we go to IMAGE>MODE>RGB COLOR. Since the destination for this image is the WORLD WIDE WEB... we will use the RGB mode. If this was to be printed, I would use the CMYK setting here.
 Now we need to set up the layers so we can apply color. That will be in "PART 2 Return of the Layers"
2 comments:
hey looking for the rest of the parts to this , step 1 is great . i don't see the other steps after scanning though.
never mind im a moron keep up the good work
Post a Comment